Securing a Data Service API with Keycloak: Identity and Access Management (Part 1)

In this article, we will explore how to set up Keycloak for user management and JWT token issuance for third-party applications. We will cover the basics of Keycloak, its features, and how to integrate it with your application.
Problem Of Reinventing the Wheel
For decades, I’ve had the privilege of starting dozens of software applications from scratch. However, I often find myself frustrated by the amount of repetitive work involved in building the same software features again and again on every project. One such feature is identity and access management, which can be described in simple terms as login/logout.
Despite its importance, many organizations reinvent the wheel when it comes to implementing identity and access management in their software applications.
I recall a project where I worked with an organization that spent over six months building a custom identity and access management system. When I asked the Engineering Director why we didn’t use an existing service like Okta, Auth0, or even an open-source option like Keycloak, I was met with a less-than-convincing reason. As a result, we ended up building a system that eventually ended up in a repository graveyard.
Fast forward to the present, I’ve recently had the opportunity to consult with an organization that’s using Keycloak to provide customized identity services for organizations. What’s impressive is that it’s working out well for them on a large scale. This experience has motivated me to share my knowledge of using Keycloak for identity and access management.
Exploring Identity and Access Management Solutions
In my research, I’ve explored various services that offer identity and access management solutions, including Auth0, AWS, Google, and Azure. While these services provide some form of identity and access management, I’ve often wondered why organizations don’t opt for existing solutions instead of building their own from scratch.
What is Keycloak?
Keycloak is an open-source identity and access management solution that provides user federation, strong authentication, user management, fine-grained authorization, and more. With Keycloak, you can add authentication to your applications and secure services with minimal effort, without having to deal with storing users or authenticating users.
Setting Up Keycloak
I will provide a docker-compose file to set up the services that we will be needing.
# docker-compose.yaml
networks:
  default:
    name: medium_demo
    external: true

services:
  server:
    image: postgrest/postgrest
    env_file:
      - .env
    ports:
      - "3000:3000"
    environment:
      # The standard connection URI format, documented at
      # https://www.postgresql.org/docs/current/static/libpq-connect.html#LIBPQ-CONNSTRING
      PGRST_DB_URI: postgres://postgres:${KC_DB_PASSWORD}@postgres:5432/InventoryDB
      # Overrides the base URL used within the OpenAPI self-documentation hosted at the API root path
      PGRST_OPENAPI_SERVER_PROXY_URI: http://127.0.0.1:3000
      # The name of which database schema to expose to REST clients
      PGRST_DB_SCHEMA: public
      # The database role to use when no client authentication is provided
      PGRST_DB_ANON_ROLE: web_anon
      PGRST_JWT_SECRET: ${ENV_PGRST_JWT_SECRET}
      PGRST_JWT_ROLE_CLAIM_KEY: ".resource_access.postgrest_api.roles[0]"
    depends_on:
      - postgres

  swagger:
    image: swaggerapi/swagger-ui
    ports:
      - "8080:8080"
    expose:
      - "8080"
    environment:
      API_URL: http://127.0.0.1:3000/

  postgres:
    image: postgres:17.0
    env_file:
      - .env
    restart: always
    volumes:
      - ./postgres-data:/var/lib/postgresql/data
    ports:
      - "5432:5432"
    environment:
      POSTGRES_PASSWORD: ${KC_DB_PASSWORD}
    command:
      - "postgres"
      - "-c"
      - "wal_level=logical"

  keycloak:
    image: quay.io/keycloak/keycloak:26.0.5
    env_file:
      - .env
    command: start
    environment:
      KC_HOSTNAME: localhost
      KC_HOSTNAME_PORT: 8080
      KC_HOSTNAME_STRICT_BACKCHANNEL: false
      KC_HTTP_ENABLED: true
      KC_HOSTNAME_STRICT_HTTPS: false
      KC_HEALTH_ENABLED: true
      KEYCLOAK_ADMIN: admin
      KEYCLOAK_ADMIN_PASSWORD: admin
      KC_DB: ${KC_DB_USERNAME}
      KC_DB_URL: jdbc:postgresql://postgres/${POSTGRES_DB}
      KC_DB_USERNAME: ${KC_DB_USERNAME}
      KC_DB_PASSWORD: ${KC_DB_PASSWORD}
    ports:
      - 8888:8080
    restart: always

  pgadmin:
    image: dpage/pgadmin4
    container_name: pgadmin4_oentity
    env_file:
      - .env
    restart: always
    ports:
      - "5555:80"
    environment:
      PGADMIN_DEFAULT_EMAIL: sejuba@example.org
      PGADMIN_DEFAULT_PASSWORD: sejuba
    volumes:
      - pgadmin-data:/var/lib/pgadmin

volumes:
  pgadmin-data:
# .env
KC_DB_USERNAME=postgres
KC_DB_PASSWORD=<enter your postgres password here>
ENV_PGRST_JWT_SECRET=<enter keycloak secret here>
To bring up the services first create a network by running docker network create --driver bridge medium_demo then you can run docker-compose up .
- postgres: Our postgres database server for keycloak and our example services.
- keycloak: Our keycloak service.
- pgadmin: admin ui to manage our postgres db.
Configuring Keycloak
To configure Keycloak, we need to create a realm, client, and user. We will use the Keycloak web UI to perform these tasks.
Go to http://localhost:8888/admin and login with admin/admin. You will be prompted to create a permanent admin user, go ahead and create one. In my case, I created admin user with credentials sejuba \ mystrongpassword .
Creating a Realm
To start using keycloak you need to create a realm, a realm is equivalent of tenants in a multitenant systems.
A realm is a space where you manage objects, including users, applications, roles, and groups.
To create a realm, go to http://localhost:8888/admin/master/console/#/master and click on “Create realm”. Name the realm “inventory”.
Creating a Client
To create a client in Keycloak, follow these steps:
- Select the realm “inventory” from the dropdown menu.
- Go to
http://localhost:8888/admin/master/console/#/inventory/clientsand click on "Create client". - Name the client “postgrest_api”.
Client Authentication Settings
- Toggle “Client authentication” to “On”.
- Select “Standard flow” and “Direct access grants” checkboxes.
- Click “Save”.
Obtaining JWKS URL and Secret
- Go to the “Keys” tab and toggle “Use JWKS URL” to “On”.
- Enter the following URL in the “JWKS URL” field:
http://localhost:8888/realms/inventory/protocol/openid-connect/certs. - Save the changes.
- in bash terminal execute this:
curl http://localhost:8888/realms/inventory/protocol/openid-connect/certs | jq -rc '.keys | first | {kid, kty, alg, n, e}'output should be similar to json below;
{"kid":"oQ2Bu-FnmAWHe3Pw04ovMDPJv2d5D1VCDTxC2PcIBPI","kty":"RSA","alg":"RS256","n":"msyByZaSAFeQ18umF7LBU1pT1SJsFTr9OiqyqPRUB0TIyQjXRRXoqO_OvmIQbMy0b3jobGYQyqOlPmJoU-BN_EEY0dc-am5u5P5CcLbLmNTX4MqbjoX9l56I4QbuowDPnG0EAuDYJxVxXR9acmDiff71cO0ZwPFKgmZHlxprGB71HBFdUMBzxFKnh8aAJlJKdW6Qu3e85boIcssQbXsqwQULz4k6e2uc8a5KY7B2UauzVcrZSWsbwI-bFr9ts2UcaHm7OIm5WhEeLxMMxjmoPboXNhp83wqVdADoMgzImNDZA_KaI6Lnn0KjteYq9jOhAquVtqTqOfpSvhQlSvE57Q","e":"AQAB"}And save the output to variable ENV_PGRST_JWT_SECRET in the .env file
Obtaining Client Secret
- Go to the “Credentials” tab.
- Select “Client Id and Secret” as the client authenticator.
- Copy the Client Secret.
Assigning Role to User
- On Roles tab create a role called “inventory_user”. Drill down into rolename “inventory user” on tab associated roles assign role “realm-management impersonation”.
Creating a User
To create a user, we will use the Keycloak admin API. Here is an example bash script that creates a user with the username “dijah” and password “test”:
#!/bin/bash
ADMIN_USER=admin#add your user name here
PASSWORD=admin # password that you created above
HOST=http://127.0.0.1:8888
echo "* Request for authorization"
RESULT=`curl --data "username=${ADMIN_USER}&password=${PASSWORD}&grant_type=password&client_id=admin-cli" $HOST/realms/master/protocol/openid-connect/token`
echo "\n"
echo "* Recovery of the token"
TOKEN=`echo $RESULT | sed 's/.*access_token":"//g' | sed 's/".*//g'`

echo "\n"
echo "* Display token"
echo $TOKEN
Now let’s replace the variable <TOKEN> with token printed from above
curl --location "http://localhost:8888/admin/realms/inventory/users" \
--header 'Content-Type: application/json' \
--header 'Authorization: bearer '<TOKEN>' \
--data-raw '{
        "username": "dijah",
        "enabled": true,
        "totp": false,
        "emailVerified": true,
        "firstName": "Adijat",
        "lastName": "Ajiboye",
        "email": "adijat.ajiboye@demo.org",
        "disableableCredentialTypes": [],
        "requiredActions": [],
        "notBefore": 0,
        "access": {
            "manageGroupMembership": true,
            "view": true,
            "mapRoles": true,
            "impersonate": true,
            "manage": true
        },
        "realmRoles": ["inventory_user"]
    }'
From the ui or api, assign the client role inventory_user to the user.
Obtaining JWT Token
Use the following API call to obtain a JWT token:
curl --location 'http://localhost:8888/realms/inventory/protocol/openid-connect/token' \
--header 'Content-Type: application/x-www-form-urlencoded' \
--data-urlencode 'client_id=postgrest_api' \
--data-urlencode 'username=dijah' \
--data-urlencode 'password=test' \
--data-urlencode 'grant_type=password' \
--data-urlencode 'client_secret=<client secret from your keycloak setup>'
We expect to get back a valid token similar to one below;
{
    "access_token": "eyJhbGciOiJSUzI1NiIsInR5cCIgOiAiSldUIiwia2lkIiA6ICJkRWlIZHgzLVRRSi1KT0hBX2NGT0hnQmtldjBPdlQ1djEta1Rwc3M5eUtVIn0.eyJleHAiOjE3MzM5NDkzMTUsImlhdCI6MTczMzk0OTAxNSwianRpIjoiZDM3MmM0OTQtYWY2NS00OTQ4LWJlOWUtZjVjNzZiMDM3YTZmIiwiaXNzIjoiaHR0cHM6Ly9rZXljbG9hay5vZW50aXR5Lm9yZy9yZWFsbXMvb2VudGl0eS1wc2kiLCJhdWQiOlsicmVhbG0tbWFuYWdlbWVudCIsImFjY291bnQiXSwic3ViIjoiZjQ5OTlmNjAtNmQyMS00OGIzLWE3NmYtNWJjMjkwN2YzNjc4IiwidHlwIjoiQmVhcmVyIiwiYXpwIjoicG9zdGdyZXN0X2FwaSIsInNpZCI6ImE4MTU3ZmI0LTMyZjktNGFmOC04OThhLWQ0MzdmZDVmMzU4ZSIsImFjciI6IjEiLCJhbGxvd2VkLW9yaWdpbnMiOlsiLyoiXSwicmVhbG1fYWNjZXNzIjp7InJvbGVzIjpbIm9mZmxpbmVfYWNjZXNzIiwidW1hX2F1dGhvcml6YXRpb24iLCJkZWZhdWx0LXJvbGVzLW9lbnRpdHktcHNpIl19LCJyZXNvdXJjZV9hY2Nlc3MiOnsicmVhbG0tbWFuYWdlbWVudCI6eyJyb2xlcyI6WyJpbXBlcnNvbmF0aW9uIl19LCJwb3N0Z3Jlc3RfYXBpIjp7InJvbGVzIjpbImludmVudG9yeV91c2VyIl19LCJhY2NvdW50Ijp7InJvbGVzIjpbIm1hbmFnZS1hY2NvdW50IiwibWFuYWdlLWFjY291bnQtbGlua3MiLCJ2aWV3LXByb2ZpbGUiXX19LCJzY29wZSI6ImVtYWlsIHByb2ZpbGUiLCJlbWFpbF92ZXJpZmllZCI6ZmFsc2UsIm5hbWUiOiJLYWRpamFoIEFqaWJveWUiLCJwcmVmZXJyZWRfdXNlcm5hbWUiOiJkaWphaCIsImdpdmVuX25hbWUiOiJLYWRpamFoIiwiZmFtaWx5X25hbWUiOiJBamlib3llIiwiZW1haWwiOiJkaWphaEBzZWp1YmEuY29tIn0.TZPOVGrVC5idV0tXKcC6jxZX1ypaRpe2K-2WgfF9dfmEzS3FjeJBjZuqYYr3Q5PAYBh3_aMTUi8TlXAANaaTj4ttpUpHqZnXeGnp-Jk0_zmFt0v1_ay85k6w6MkBrBEzaqvwnxbbY-dDoYW7V3EUywaX9Am5EAudqINXHbVhF-kASo3XhlR7pDGeiORanSrf1jWAXAiFBYcyiRzgXNn6V5L0cFyPto_e0002B7Bxg9PCkVUmnzE-1UNwGLPx5D7Ao0o-KRkuqo2wlHyjKEJsK5zkdgwTmZkD4mA56osRMHi12PFW0HUypGpCMD95COjGGyamq74NPQn7PdUM6L-8tQ",
    "expires_in": 300,
    "refresh_expires_in": 1800,
    "refresh_token": "eyJhbGciOiJIUzUxMiIsInR5cCIgOiAiSldUIiwia2lkIiA6ICI3NDcwYWEyMS0yNThiLTQ1MTYtYWJhMC1mY2RlMTU2Y2M1NDYifQ.eyJleHAiOjE3MzM5NTA4MTUsImlhdCI6MTczMzk0OTAxNSwianRpIjoiMGEzNjY3MDItODgwNS00MzllLWFiMDAtYzIwOGRjMjBkZGZiIiwiaXNzIjoiaHR0cHM6Ly9rZXljbG9hay5vZW50aXR5Lm9yZy9yZWFsbXMvb2VudGl0eS1wc2kiLCJhdWQiOiJodHRwczovL2tleWNsb2FrLm9lbnRpdHkub3JnL3JlYWxtcy9vZW50aXR5LXBzaSIsInN1YiI6ImY0OTk5ZjYwLTZkMjEtNDhiMy1hNzZmLTViYzI5MDdmMzY3OCIsInR5cCI6IlJlZnJlc2giLCJhenAiOiJwb3N0Z3Jlc3RfYXBpIiwic2lkIjoiYTgxNTdmYjQtMzJmOS00YWY4LTg5OGEtZDQzN2ZkNWYzNThlIiwic2NvcGUiOiJ3ZWItb3JpZ2lucyByb2xlcyBlbWFpbCBwcm9maWxlIGFjciBiYXNpYyIsInJldXNlX2lkIjoiM2JlZmJkZTQtZTU4OS00ZDQwLWFjNmMtMTk1ZjcwYWI0NGQyIn0.BmlHp3HmWQ62XpXT524wtWDcMgh2OeRgtdW-uIXTsMw9OBC6GwB6lWvneX458cEmIgLSK_vVO65qSWxpy7ET0w",
    "token_type": "Bearer",
    "not-before-policy": 0,
    "session_state": "a8157fb4-32f9-4af8-898a-d437fd5f358e",
    "scope": "email profile"
}
The response should contain a valid JWT token. You can verify the token by copying and pasting it into jwt.io.
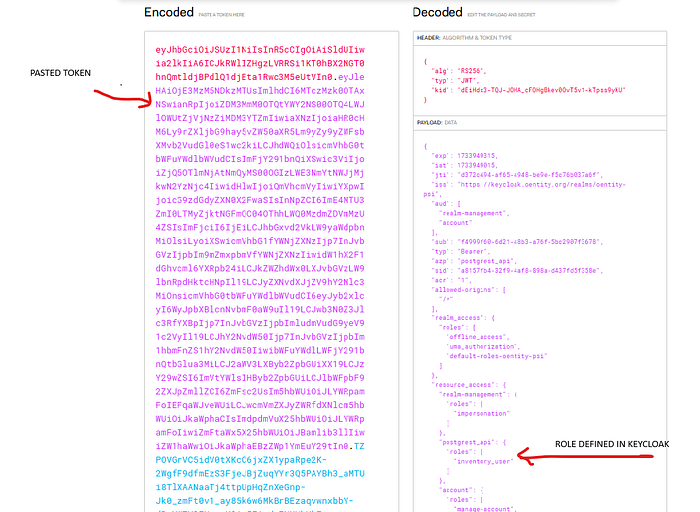
We can see, that we are able to pass role and other user information defined in keycloak through our token for third party app to use.
Key Takeaways
- Problem of Reinventing the Wheel: Many organizations spend unnecessary time and resources building custom identity and access management systems.
- Keycloak Overview: Keycloak is an open-source identity and access management solution that provides user federation, strong authentication, user management, fine-grained authorization, and more.
- Setting Up Keycloak: The article provides a
docker-composefile to set up Keycloak with Postgres, pgAdmin, and other services. - Configuring Keycloak: The article guides through creating a realm, client, user, and obtaining a JWT authentication token.
Keycloak Configuration Steps
- Create a realm named “inventory”.
- Create a client named “postgrest_api”.
- Create a user with the username “dijah” and password “test”.
- Obtain a JWT token using the client ID, client secret, username, and password.
Next Steps
In the next part of the article, we will integrate Keycloak with a Postgrest server to demo a DB-based application.
If you find the post useful, a clap will be appreciated and please follow my account. See you in part 2 of this post.